Posts

Plants with a microscope
Image
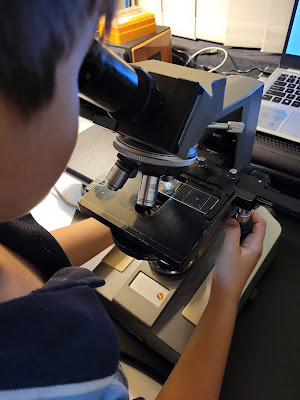
Last week I had the opportunity to use a real microscope. A friend of my Dad's has one and he showed it to us. One of the things we saw was the skeleton leaves that we talked about in the previous article. I think the photo was really cool This other photo is from the top side of a leave. You can see a white vein. You might be wondering what that little black line is? Yes, the one that looks like a closed eye. Well, that is a estoma. We saw in the previous article that estomas are used to breath in carbon dioxide and breath out oxygen. The majority of the estomas are on the bottom side of the leave. You can see them here more closely. These ones look like they are open.  Finally, we cut the stem of a leave hoping to see the xylem and the phloem. Our friend told us that the spiral you see in the photo is the Xylem. The plant uses the xylem to bring up water from the roots
Photosynthesis

Image
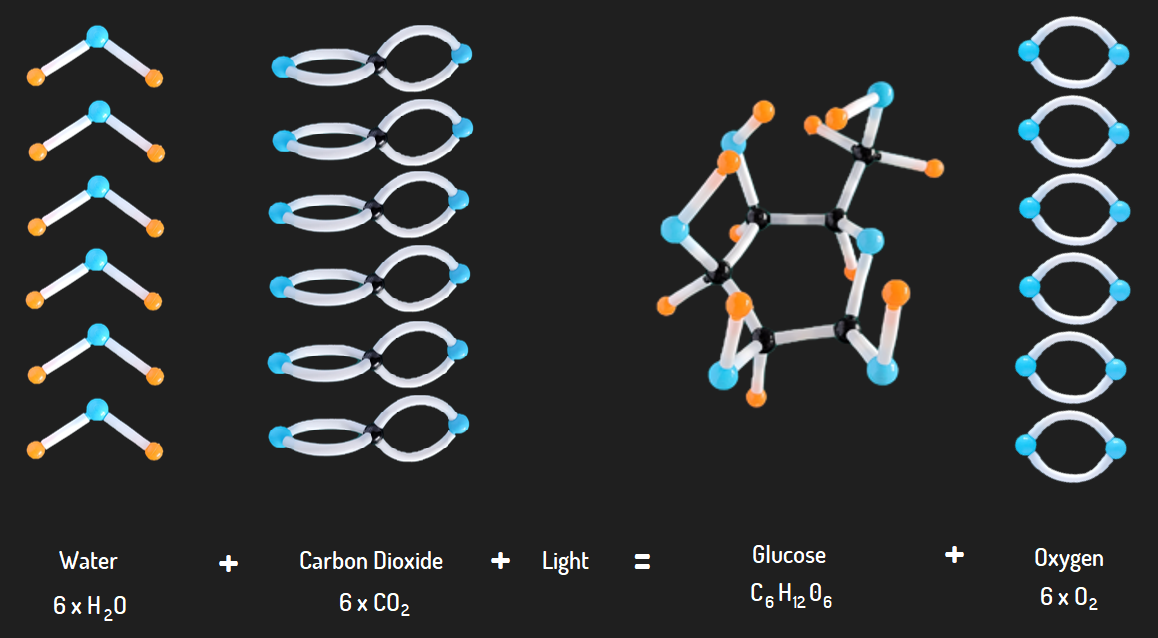
You might be wondering what photosynthesis is ? Well I'm glad you asked. Photosynthesis is a process the plants use to make their food.  They take in H2O which is water and carbon dioxide or CO2 sunlight and with that they reproduce glucose and oxygen. The water comes up from on the roots through a tube called xylem and carbon dioxide goes in through the estomas in the leaf. The glucose they produce goes down another tube called the phloem to other parts of the plant and chuck out the oxygen through the estomas. I built the molecules with my new chemistry model kit. You can see photos of the full chemicals reaction below. The simplest carbohydrate which is basically a sugar. This is the basic building block for the plants and it is used to make everything from leaves, fruit, pulp and bark. For example the plan change of as many as thousands of glucose is to build cellulose. The cellulose is used to build the pulp of the trunk which is what we used to make paper. The following is a ...

Skeleton Leaves

Image
In this blog post we will be showing you how to make your own skeleton leaves. Well you might be wondering what a skeleton leaf is. Well, it's basically the inside structure of the leaf that supports it and also includes tubes that transport nutrients. There are two types of tubes: the xylem and the phloem. The xylem brings water from the roots up the phloem brings glucose down. To make skeleton leaves  you need to gather some leaves from many different types of plants because you don't know which ones are going to work and which ones are not going to work.  For the next step put them in boiling water with baking soda for one hour. This makes the water alkaline and it helps destroy the soft parts of the leaf that we don't need. Then, put them in a little bit of water with a tablespoon of bleach for a few minutes. In our first attempt we put too much bleach for a few hours so some of them became white as you can see in the photo Then, you need to start brushing it. You wil...

Micro:bit watering system

Image
My class has been doing an experiment on plants where we had to water them at different times.  We have been watering our plants manually which means it is not very accurate. So I thought maybe we could make a machine to water them perfectly. Our solution is based on a microcontroller called the Micro:bit. We have a moisture sensor reading the amount of moisture in the plant and sending it to the Micro:bit through a cable. If the moisture is less than a certain level, which depends on the plant, it will send a message to switch on the pump. You may be wondering, what is the thing connected to the hose of the pump? Well, that is a shower cap that we designed and 3D printed to spread the water better. If you are interested on printing the shower cap (water spreader) you can download the files from Thingiverse here:  https://www.thingiverse.com/thing:6204986 This is the code for the Micro:bit The following video shows how the whole thing works

Fruit Ninja game in Scratch

Image
Today I am showing you a game we made about a ninja slicing fruits in Scratch. You can play the game in this link: https://scratch.mit.edu/projects/604420986 The goal of the game is to get as many points as possible before time runs out. Different fruits give you different points. The watermelons give you 1 point and the oranges give you 2 because they are smaller. The most valuable is the kiwi but it falls very fast You start with 60 seconds, time starts counting down but every time you get the clock you get 10 seconds extra You also have to avoid getting hit by the bomb, which as you can see is a really big one. If you do, the game ends with a big explosion Careful! the game can get a bit addictive. And by the way my record is 363 points. Let me know in the comments what your best score is. Enjoy!

Scratch - Pling Plong

Image
 I have built a game called "Pling Plong". It is based on the "Pong" game which was one of the first ever computer games. It is a bit like tennis but in my version the ball is a sprite in Scratch called "Gobo" and the rackets are buildings It is a two player game. One player takes the red racket and another the blue one. The red player uses "q" and "a" in the keyboard and the green player uses the "up" and "down" arrows. You can access the game here: https://scratch.mit.edu/projects/620944185 Enjoy!

Artemis I

Image
Next week NASA is going to send a very important mission to the Moon, called Artemis 1. The Artemis program is very important because it's going to be the first one to send people to the moon in 50 years. But Artemis 1 mission isn't going to send real people to the Moon, neither it is going to land on the Moon. It's just going to have dummies inside. So you might be wondering what's the purpose of this mission? It's to test a new cool rocket called SLS (Space Launch System). Are you wondering who are the astronaut's on this mission? well there are no astronauts but there are dummies to test the radiation and things like that and there's one that maybe some of you know from a TV show call Shaun the Sheep. It's not strapped so that we can see when there is no gravity. If you want to interact with the mission you can get a boarding pass like the one below and you can get your name on a memory stick that will be in the capsule that will go around the Moon. Y...

Project Vortex

Image
During the previous 4 blog posts we have been teaching you the skills required to do a Vortex. Let me explain you what Vortex is. In August my school had a school Fair. We had the idea of making an arcade game to raise money for the school. We wanted to charge for playing the game. If you won at the game you would get prizes. We built it over 3 weeks. The code was part of it. We used the Micro:bit. The physical build took a big part of effort as well. We called the game "Vortex". The Fair was hard work as we had to be in the stand for 4 hours. More than 100 people came to play but in the end we managed to raise good money for the school. This is a photo of the stand with people playing Vortex The game is about a light that spins around and you have to stop it in a certain position with a button. The light starts spinning slow and then gets faster with every loop. You get more points for stopping it when it goes faster. This is a video of the game in action We are going to sho...

LED strips with Micro:bit

Image
One of the funnest things to play with are LEDs. These are a type lights. They can be single colour or you can code them to be any colour you like. The type where you can select their colour are called RGB. You can get individual LED or multiple ones arranged like a strip or sometimes like a ring The Micro:bit can have more blocks that the ones you see. You have to add them as extensions. There are many extensions available. You can add them by clicking on "Extensions" like this The one we need for LED strips is called "neopixel" Once you add the "neopixel" extension there will be a new category with new blocks to control your LED strip. You can see them in the following picture To test it do the code below. With the first block we are telling the Micro:bit that there is an LED strip connected to pin 0 with 7 LEDs. Every time you connect something external to the Micro:bit you connect it to the pins, so it is important to let it know exactly what pin is co...

How to save the code to your Micro:bit

Image
So far we have only used the simulator but today we are going to learn how to save the code to our Micro:bit. So, hopefully you have already got yourself a physical Micro:bit, so let's go First, once you have your code ready, click the "Save" button, like in this picture: A ".hex" file will be created and downloaded to your computer. A message like the one below will appear. Then click "Done" This is the file we will upload to our Micro:bit. To find the file in your computer, click on the downloaded file at the bottom of your browser and select "Show in folder" Now, connect the Micro:bit to the USB port in your computer. It will show up as if it was a USB stick. As you can see in my computer shows as "MICROBIT(D:)" Now simply right-click on the file, select "Send to MICROBIT(D:)". An orange light starts flashing on the Micro:bit. The code is fully uploaded when the light stops flashing and your Micro:bit is ready to go

Making sounds with Micro:bit

Image
Today we are going to show you to make sounds with Micro:bit. Did you know that there two versions of Micro:bit? They are the original Micro:bit and the V2. The original doesn't have a speaker sadly. But V2 does. If you can, get yourself a V2. Nowadays it is hard to buy the original Micro:bit anyway. Let's write some code. First open a browser such as Chrome, go to this site and click "New Project": https://makecode.microbit.org/# I am going to call my project "Star Wars sounds" ... you will see why later. Now the project opens. All the sound related commands are in the category "Music". You can make your own songs with "Melody" and "Tones". Further down, there are some melodies ready to use. And at the very bottom there are some advanced functionalities that are only for Micro:bit V2. They are pretty cool! I have created with my Dad two melodies from Stars Wars: one for the good guys and one for the bad guys. They have about 10...

Your first Micro:bit project

Image
The Micro:bit is a kid-friendly microcontroller. Microcontrollers are a bit like computers but simpler and less powerful. I really like the Micro:bit because it is easy to program and allows me to interact with lights, sound, motors and many other fun things To write code for the Micro:bit you go to this site: https://makecode.microbit.org/#editor This is what it looks like. The thing in the middle contains all the coding blocks (Basic, Input, Music ...). You can drag them on to the right side of the screen to build your program. At the start you get the "on start" and "forever" blocks. Finally, the thing on the left is the simulator. Here you will see what your code does Today we are going to do a simple project to get some skills. I will need these skills for a cool project that we call "Vortex". We will talk about "Vortex" in a future post When you look at the Micro:bit you will see that it has 2 buttons ("A" and "B") and a...